Controlling servo and stepper motors with pyMCU
Servomechanism, or a servo for short can be found in RC car models where they can turn the wheels or flip ailerons in RC planes. They can also move mechanical arms and grippers. Making it simple a servo is a motor with some gears and electronic controller that knows the current motor position and can set it to any requested from the supported range. Simple servo can move only in some range, like 180 degrees, but there are also continuous servos. With a big bunch of servos you can create a hexapod - mechanical spider.
Stepper motors can be handy in devices that require very precise movement (like CNC machines). The motor moves in steps and each step is triggered by a electronic pulse. You can precisely control by how many steps the motor will move.
Servomechanism
Robotics and electronics shops can offer a wide range of servos from small servos for RC models and alike to big with high resolution and torque for heavy duty work. I used a small and cheap TowerPro SG90 9G servo available from China and from many local shops around the world. It's smaller than a box of matches.
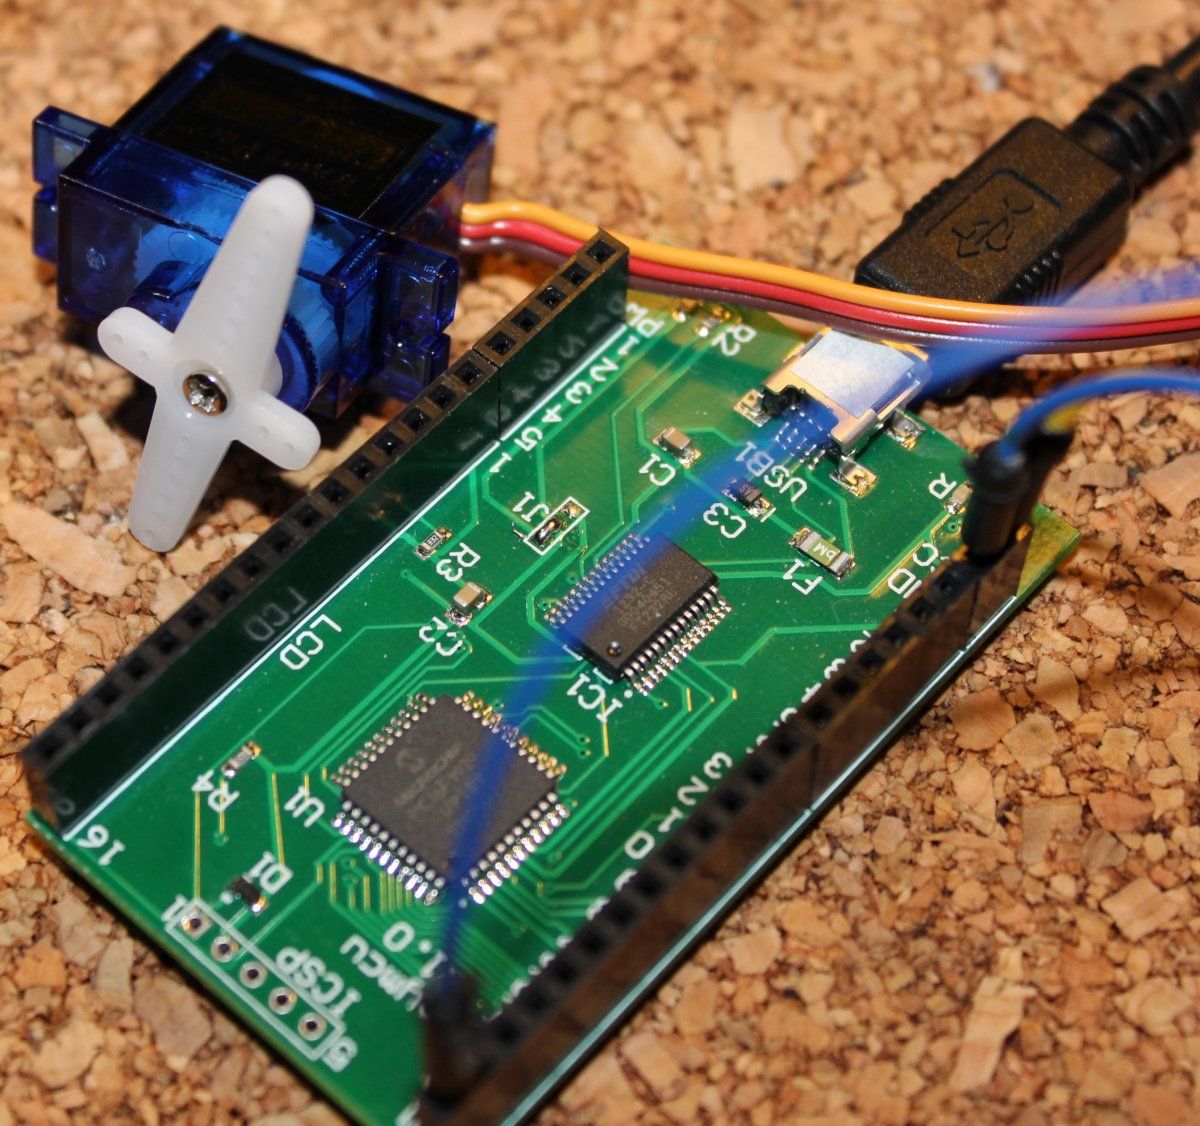
Each servo has three wires - GND (-), VCC (+) and signal wire. In case of SG90 yellow is the signal, orange is the "+", and brown is "-" (GND). Color vary with vendor so if you have different servo check its documentation.
When you connect power to a servo nothing will happen - no signal on the signal wire. Usually it's done by PWM, but pyMCU PWM pins work at to high frequency to control servos directly. The board can however emulate PWM to some extend by pulses on digital pin.
Small TowerPro SG90 9G isn't power hungry and can be powered from pyMCU (host USB). For more power demanding servos you have to use external power supply and connect the ground with pyMCU ground (as shown in the original tutorial).
Connect yellow to D1, orange to VCC and brown to GND and you are ready to go. Lets start with a code that will move the servo from one edge position to the other one few times:
import pymcu

mb = pymcu.mcuModule()

for i in range(0, 4):
  mb.pulseOut(1,800,40)
  mb.pulseOut(1,2000,40)
The pulseOut method can be used to simulate PWM. First argument is the pin number, second pulse duration and third - number of repeats (in PWM it's constant). Duration sets the servo at given position. For this model it seems that duration between 800 and 2000 is valid. Repeats determine the time in which servo must go to the desired position. If you use to less repeats the servo will stop before reaching the position. If the servo is at given position sending more pulses will actively try to keep it at it (if some mass attached to servo wants to pull it - the servo motor will try to go back to the position).
I've also written a PyQt4 application that gives you a GUI for servo control. Using arrows you can move the servo by a step in one of the directions:

If you want to use multiple servo or you want full control over it you should use a servo controller like Adafruits I2C controller or Pololu USB/TTL controller. They use PWM to control the servos.
Stepper motors
Stepper motors are more advanced that DC motors and come with multiple wires. I used a cheap Chinese 28BYJ-48 stepper motor with ULN2003 stepper motor controller in one kit. It's quite good, and cheap so very good for experimenting with servo motors. You can find it on dx.com and many other shops. There are tutorials on the web for Arduino, Raspberry Pi and other microcontrollers.
Stepper motor controller like ULN2003 makes it easy to handle stepper motors. You just have to turn some of 4 digitals pins on and off in a pre-defined sequence of steps. Every model may have its own sequence so check the documentation first.

We have two +/- pins for stepper motor power and four pins to control the motor. I used a 9V battery via 5V step-down converter to power the motor. I connected the four pins to pyMCU D1-D4. The code looks like so:
import pymcu

mb = pymcu.mcuModule()


steps = [
    [1],
    [1, 2],
    [2],
    [2, 3],
    [3],
    [3, 4],
    [4],
    [1, 4]
]

pins = [1, 2, 3, 4]
current_step = 0

for i in range(0, 2000):
    high_pins = steps[current_step]
    mb.pinLow(pins)
    mb.pinHigh(high_pins)
    current_step += 1
    if current_step == len(steps):
        current_step = 0
    mb.pausems(5)
The steps list contains the sequence needed to to move the motor forward from one step to another - number of pins which need to be at high state. To move backward just reverse the sequence.
In the 2000 repeats loop I execute that sequence multiple times to get a noticeable motor movement. pausems is used to give the motor time to move. If it's to short the motor won't move correctly. If it's bigger the motor will move slower as there will be gaps between steps. If you will use them in a robot - it won't move quickly.

In shops you will find bigger and stronger stepper motors. To control them you will need a controller like the ULN2003 or other made by Pololu, Adafruits or some Arduino shield. The idea should be the same.


Comment article